

Measurement Guide
In custom-size furniture, the most critical step is taking accurate measurements. A single miscalculated centimeter can prevent a flawlessly produced piece of furniture from fitting perfectly.
Make Your Furniture Fit Perfectly: Step-by-Step Accurate Measuring
The most critical step in custom-made furniture is taking accurate measurements. A single centimeter miscalculated can result in a perfectly crafted piece of furniture not fitting properly. This guide explains step-by-step how to measure width, height, and depth, how to account for obstacles such as baseboards, cornices, and columns, and how to avoid the most common measurement errors.
Common Measurement Mistakes
-
Measuring from a single point
The most common mistake. Walls are rarely perfectly straight; without measuring from three points, it is not possible to find the smallest value.
-
Ignoring skirting boards
Especially when measuring width at floor level, not accounting for skirting boards can prevent the furniture from fitting into place.
-
Not leaving tolerance
Ordering the exact measurement may be tempting, but a 1-1.5 cm movement allowance is essential during installation.
-
Forgetting the delivery route
Always check whether the furniture can pass through the room door, corridor, and elevator if there is one. Door width and height are critical for wardrobes and large furniture.
-
Not noting the internal measurement
For products such as cabinets, drawers, and shelves, internal usable volume is as important as the external measurement. Stating the internal measurement separately speeds up the design process.
Special Cases
- If there is a carpet: Flatten it by pressing down at the measurement point; carpet thickness can change the height measurement.
- If there is a radiator or heater: Measure and note the distance between the radiator and the wall so the furniture does not block the heat source.
- If there is a column or beam: Measure the thickness and position of the column in detail; our design team will provide a custom solution based on these values.
Before You Start
Measurement guide
- First step to get started: prepare a good tape measure, a pencil and paper.
- For accurate measurements, clear the area where your furniture will be installed; remove any furniture and accessories that may get in the way.
General measuring steps
General measuring steps
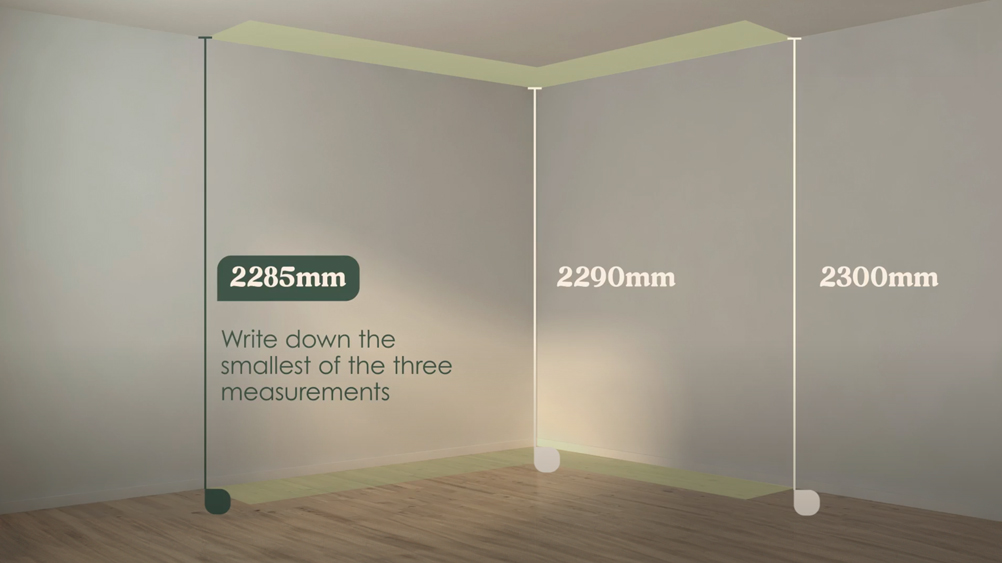
- Measure the height of your room: take measurements from three different points from floor to ceiling, ignoring skirting boards or trims. If there is a carpet, press it down to flatten it.
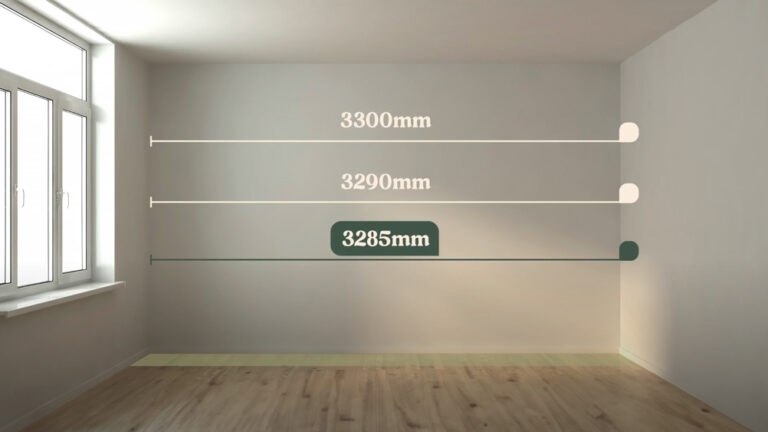
- Measure the width: take measurements from three different points from floor to ceiling. Do not take skirting boards into account during measuring.
- Measure the depth of your custom furniture: measure from two points, front and back, and include any existing skirting boards in your measurements.
Measuring for corner furniture
Measuring for corner furniture
L veya U düzende köşe çözüm planlanıyorsa her iki duvarı ayrı ayrı ölçün. Köşe dönüşlerinde her duvar için üç farklı noktadan (alt, orta, üst) genişlik alın ve en küçük değeri baz alın. Yükseklik ölçümü standart kuralla aynıdır: üç noktadan en küçük değer, eksi 1–1,5 cm tolerans.
Measuring for niche or built-in furniture
Measuring for niche or built-in furniture
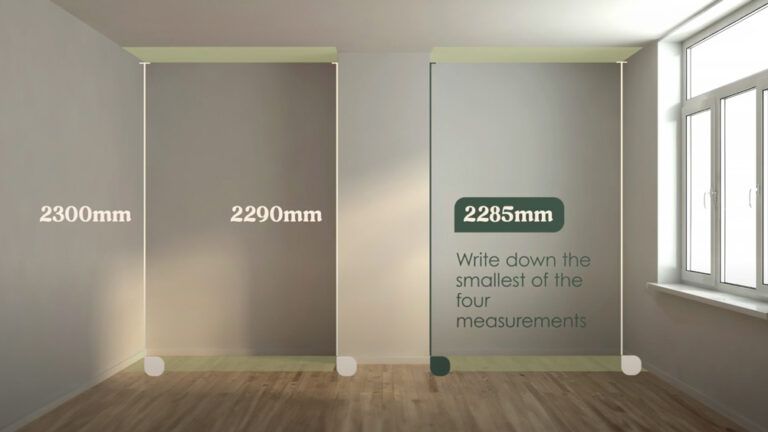
For niche applications, take height and width measurements from three different points. For the depth measurement, measure from the front and back points and include any existing skirting boards; this way your furniture fits the niche perfectly.
Note: The values in this guide are compiled according to standards. For the specific tolerances your project requires, you can get in touch with our design team.